Wednesday, May 18, 2005
Better Brakes
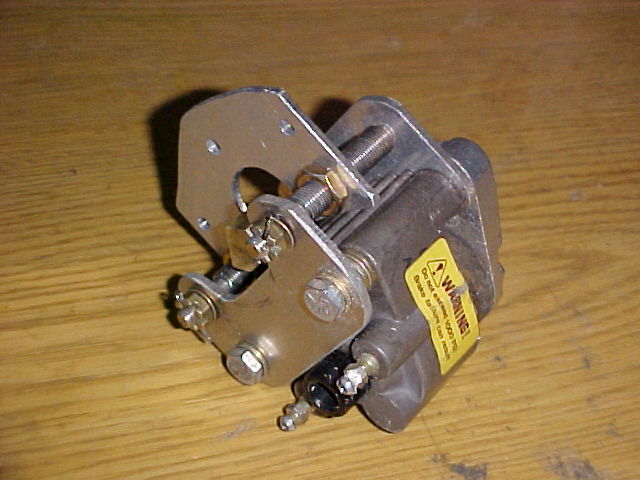
I have now had a few flights and landings on my new Q-200 taildragger brake mounts. If you scroll down to some previous posts you can see the photos of them. I really like them. They are better designed and less prone to twisting, therefore less prone to grabbing and chattering. At this point, if you are using Airheart brakes I would recommend making the change.
The mounts first appeared in Q-Talk #27 and were designed by Doug Coughlin. In case you don't have that old Q-Talk I drew the parts on CAD and posted them as a .PDF file. You can get them here: Coughlin Brakes You also need to drill a hole through some 3/8-24 threaded rod (McMaster-Carr). They are really pretty easy to make.
I'll try and get some more details posted in the future and I'll stick it on my website too.
Sunday, May 01, 2005

Saturday, April 02, 2005
Pure epoxy as a filler
This week I started filling the scratches, using a totally different approach. Different for me, anyway.
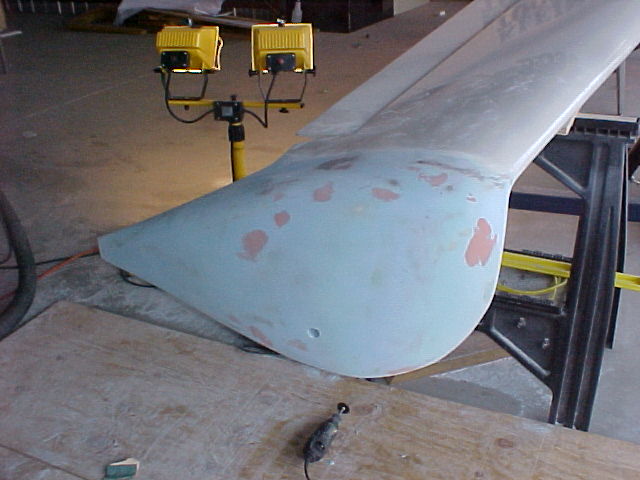
I first started with the brake covers. (They are made of three layers of BID and no foam). First, I scuffed the surface to allow good adhesion, then applied a single thick layer of pre-mixed Super Fill. I allowed it to cure for a couple of days, then sanded it down with 36 grit, then some 80 grit paper.
Those of you who have finished their planes will be familiar with the look of the filler material, at this point. There were lots of holes in the filler, pinholes and much larger, and major sanding scratches. But, this is what I wanted, I wanted to test this new method.
In the article "Finishing Composite Aircraft" the author says he sanded with 36 grit then some 80, then stopped. Cory Bird, builder/designer of the Symmetry (the only perfect aircraft I have ever seen), did an interview where he says he sanded with 36 grit then stopped. If it worked for him there is a slim change it will work for me.
So anyway, my brake covers had the desired contour, but were full of scratches and holes. I mixed up some Gouegon Bros. Pro-Set epoxy, squeegeed it on, then squeegeed off as much as I could. I repeated this every day, for five applications. (Cory Bird made five applications). I didn't sand beetween applications since the expoxy was still tacky.
The result was that all of the holes and scratches are nicely filled! I remember all the trouble I had in the past, filling pinholes and this completely eliminated them. After the last application cures for a couple of days, I will sand it with 150 grit, then start with the primer.
Since the results with the brake covers looked so promising, I started the expoxy treatment on the wheelpants. As of last evening, I have three applications complete. There were MAJOR scratches in the wheelpant filler. In the past I would have spent lots and lots of time sanding, and probably re-filling. This epoxy method seems to work great and I will definitely use it when I finish my new wing.
Sunday, March 27, 2005


My Pants
I can finally see light at the end of the tunnel! These wheel pants have taken a LOT longer than I had planned. Of course the weather, and life in general, can slow the progress. For the right pant I used the Super Fill epoxy filler. It goes on fine and is easy to work with.
I wanted to compare materials, so for the left pant I used AeroPoxy Light. It too, worked well. One comment about these premixed microballon fillers. I liked the Aeropoxy best for applying and filling, and it was a little cheaper than the Superfill. However, they are both a chore to mix! The first problem is, after time the epoxy can settle to the bottom of the can. The stuff is very thick and I broke a couple of paint mixing paddles trying to stir it up. I tried heating the stuff with a hair dryer and that helped a little.
Both materials were about the same to work with, however I thing the Aeropoxy Light was a little cheaper, and they included a little more material per quart kit.
One other note, I spoke, on the phone, with an Aeropoxy Light engineer and he said the unused product should be stored upside down, to bring any free resin toward the container's lid.
The filling process for the pants is pretty much complete, but since I have a whole wing yet to finish and install, I have not yet decided if I am goiing to buy more of the pre-mix filler , or to go ahead and make my own using epoxy.
Another thing that I am going to try different. Did you happen to see Cory Bird's beautiful yellow Symmetry at Oshkosh last year? That was the most perfect aircraft I have ever seen. In an article in Sportsmanpilot.com:
" Next came what Cory calls a resin wipe. After going over the surfaces with 36 grit sandpaper he spread on a coat of pure resin, then immediately began squeegeeing it all off. With a little time for cure between applications, this process was repeated five times, leaving just a film of resin maybe two or three thousandths thick, filling every 36 grit scratch and all the pin holes. That was followed by wet sanding with 150 grit, then a coat of DP-48 epoxy primer and a guide coat of some color - just enough to see when it is sanded off".
I'm going to try that method. Maybe I can squegee it on in 12 hour intervals. That should be enough to get the cure process to start, but not so hard that I would have to sand between coats.
Saturday, March 26, 2005

Wednesday, March 09, 2005
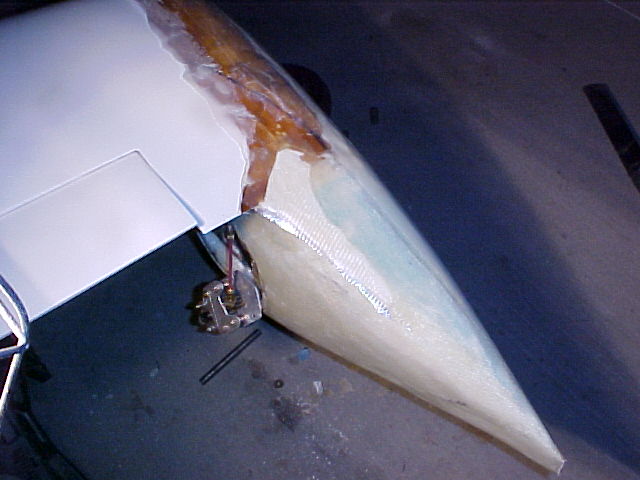


Here is how I did the canard-to-pant trailing fillet. First, I needed to build up the area with two part foam. Two-part foam is a miricle chemical! Be sure and get the good stuff - don't ever use the hardware store variety. In this photo I have used plastic film and duct tape to mask off the tunnel which will contain the foam.
Tuesday, March 01, 2005


Sunday, February 27, 2005


Subscribe to:
Posts (Atom)