I will be participating in this year's AirVenture Cup race - again and
making my 19th trip to the Oshkosh convention. I depart for Dayton
this coming Saturday, then do the race on Sunday, July 22. The race
is slightly shorter this year and I hear they are making some
accommodations for fuel stops. The race link is www.airventurecup.com
Here is this year's lineup in the Sprint class (O-240 cu. in or less).
22 Quickie Q-200 Sam Hoskins
44 Velocity Scott Jones/ Bill Schiferl (74 cu. in. Mazda rotary?)
47 Vari-EZE Greg Shaskan / David Shaskan
64 Sportsman Sonerai I Jeff Lange (VW engine?)
90 Lancair 235 Dennis Collins / Kathyrn Collins
111 Vari-EZE Klaus Savier
Again, I am dismayed to see Klaus enter again. I was thinking maybe
we could have a leg-breaking event for him the night before the race -
otherwise he will surely wax me. Last year he posted a speed of 241
mph!
The #64 Sonerai is a new entrant and an unknown adversary. I know
some of that class of aircraft hasn't participated before because of
the long distances and the fuel requirements. (At wide open throttle,
my O-200 uses about 10 gallons per hour.) Now, with an unknown
allowance for a fuel stop I don't know what to expect.
I'm also not familiar with the #47 Vari-Eze, so I don't know if it's a
fast one or not. If it is a stock Vari-Eze it should be not problem,
but if he is a speed freak it could be trouble. I did beat #90
Lancair 235 last year by 5 mph and #44 Velocity by 16 mph. As long
as my engine hasn't lost too much poop over the last couple years, and
everything hold together, I can still hope for a second or third
place.
FYI, my past race speeds and standings were (in mph):
2002 172.08 Second out of 3
2003 182.53 Fourth out of 12
2004 201.12 First out of 6
2005 200.31 Second out of 5
2006 202.03 Third out of 7
My annual condition inspection took a little longer this year, I had
to pull a cylinder to heli-coil one of the cylinder studs. That was a
real pain and far more expensive than it should have been. But I flew
it a couple times this week and all seems to be well.
So that's about it. They usually post the results at the EAA
AirVenture web site a day or so after the race.
See you at the Big Show!
Wednesday, July 18, 2007
Friday, September 15, 2006
How 'bout that wheel & rudder? My strong opinions.
We're talking Q-2/Q-200 taildraggers here. Nose gears need read no further.


On the Q-List there are lots of opinions about the need for a bigger rudder or fancy tail wheel and bracket. Some taildragger expert recently said something to the effect that "the plane needs a bigger rudder because the fuselage blanks out the vertical stab when the wheel is on the ground". Gee Whiz - I didn't know that. I guess I didn't know what I was missing.
I had to buzz down to Cape Girardeau yesterday and thought I'd try it out. On landing I tried using the tail wheel and rudder. Nope - nothing missing when I'm decelerating. I have full authority all the way down from touchdown 80 mph down to zero mph.
Alright, let's try a "slow" takeoff. I tried pushing the throttle in gradually, to see if there was a range where the rudder, tailwheel was ineffective. Nope again - full authority throughout the entire range.
So here's the deal, here's my humble opinions. Print this list out and paste it on your refrigerator door. Either that, or use it for TP.
1. The stock rudder does not need to be modified.
2. The stock tail wheel and bracket does just fine.
3. The stock tail spring needs to be beefed up. The stock ones break. (There are lots of ways to accomplish this fix. I have had very good results from Peter Harris's fiberglass spring).
4. You must align the wheel axles so if you peer through one, while the full weight of the plane is loaded, that you are aligned within a couple of inches of the opposite axle. If you build and align the wheel pants to plans, you will find when you sight through the axle that you will be looking at concrete instead of the other axle. This is bad. Seeing the other axle centered in the hole is good. Fix it, but don't get too anal about it, if you are within a couple of inches you should be a lot better off than you were. This is commonly referred to as the Gall Alignment. Do a search on it.
5. The Airheart go-cart brakes are plenty adequate, but the QAC mounts are crap. The LaRue brake mount is better, and the Coughlin mounts are better yet.
6. Differential brakes are a great mod. It took me 1,000 hours to admit it. Some guys use toe brakes - I use finger brakes. Six of one, 1/2 dozen of the other. I like the finger brakes because they are easy to access and maintain. Mine are mounted just aft of the throttle.
7. It's a very good thing to have a splitter in the rudder cables. That way, if the tail spring should break, you still have the rudder. Ditto the differential brakes.
8. I think the aftermarket intermediate rudder cable bellcrank is unnecessary.
9. The plane is FAST on the runway and requires your undivided attention to keep it on the centerline. This is not a Cessna 172.
Coughlin brake mount installed.

Coughlin Brake Mount

Rudder pedal splitter. One goes to the tail wheel and the one with the turnbuckle goes to the rudder horn.

Differential brakes and their respective master cylinders.

Tuesday, August 08, 2006
Another Oshkosh

Another year, another race.
The race went well, since I posted my fastest course time ever at 202.03 mph. Eric Whyte, the race's grand poobah, pointed out that since my speed was the same as my N number, I should consider changing my registry to N302SH, in advance of next year's race.
I was feeling pretty good when I showed up, until I found Klaus had entered. But, the first thing is to fly the course and land safely, then all else follows after that.
The plane flew well and the engine hummed along at 3,050 RPM. My oil temp never got above 190 and the cylinder temps stayed around 325, so my cooling system is working very well. Again, a full plenum and no oil cooler is all you need.
We had seven planes in the Sprint class, although nine had pre-registered. Though I took third place, I did manage to beat a Lancair 235, an RG Velocity and a Long-Eze. There was also a Glastar in our class, but he's not exactly what you would call competitive.
All told, there were 60 aircraft registered in the various classes and I managed to best 22 of them, including a whole mess of RVs.
Naturally, winning isn't everything, but it is fun to pass other planes on the course. I see my GPS recorded my max speed as 196 kts. - sure would have been nice to be my race speed.
So what next? Every year, after the race, I wander around Oshkosh and look for things I can do to pick up an extra knot or two. Actually the list is long:
* Prop extension to 8 inches, to better streamline the cowl.
* Straighten out the tail spring to fair better into the fuselage.
* Convert to exhaust augmentation.
* Smaller cooling nostrils.
* Replace 9:1 pistons with 10:1.
* Chop the oil sump down to fair better into the bottom of the canard.
* Make the air intake smaller.
* Remove the tail light fairing from the top of my vertical fin.
* Better fairing where the elevator meets the fuselage.
* Install a smaller carburetor, such as an Aero Carb, to allow me to
cut down the cowling.
* Higher tech prop.
But as I was flying home I thought "You know, a guy could buy a Q-200 virgin kit and cut the fuselage down the middle and make it a single seat Super Quickie (a Slickie?). Cut a foot, or so, off the wings, install an O-200 - then I'd give those guys a run for their money!
Anyway, it's all fun and there's nothing like building, flying and racing a plane you built yourself. Keep at it guys, the prize is on your horizon.
 The other thing I wanted to mention, was that this year I picked up my "This Classic Homebuilt Has Been Flying for 20 Years" prop tag.
Here are the race results.
Friday, June 23, 2006
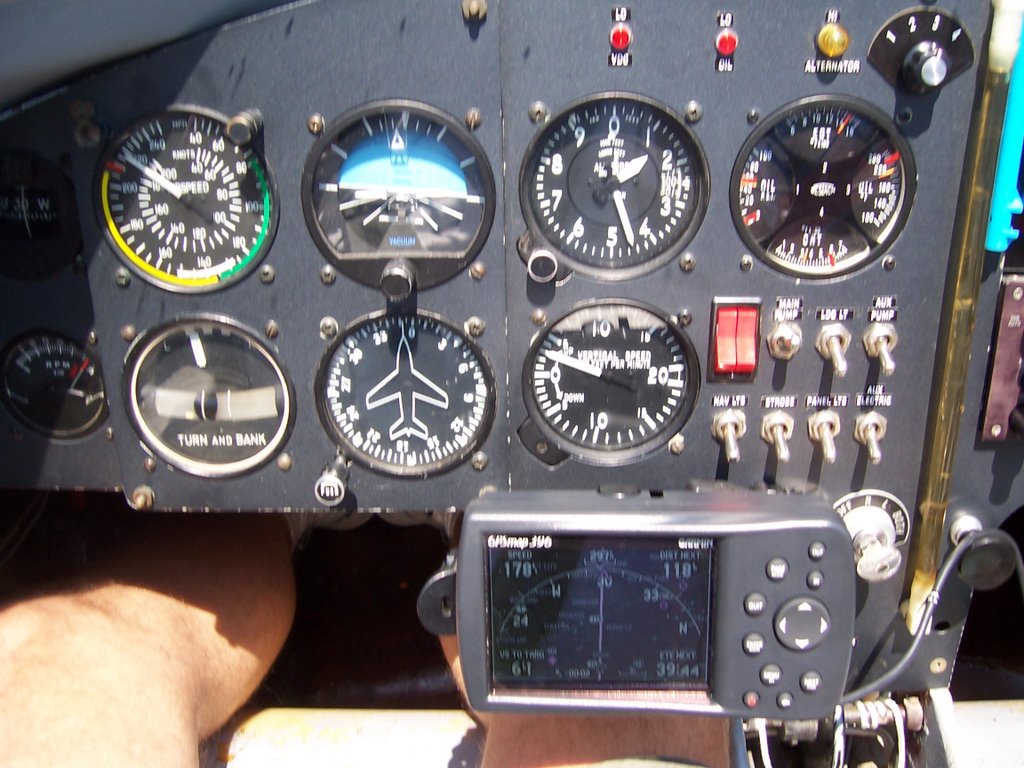
Cross Country in a Q-200
Just an update, Sandy & I got back, on Thursday, from our big trip out west. We had a family reunion in Sonoma, CA, so we loaded up the Quickie and flew out. And I do mean loaded. In addition to us, we had 30 pounds of baggage and an aux fuel tank with another 54 pounds of fuel. (31 gallons, total fuel capacity).
We made leisurely RON stops in Topeka, Ft. Collins, CO and Wendover, UT (won enough money at the casino to pay for fuel and lodging) and finally Santa Rosa’s Charles Schultz airport. Crossing the Rockies and the Sierras is quite interesting. I have done that before, but this time there was more weather and wind to contend with. A Garmin GPS 396 would have been very handy to have.

My mighty O-200 performed really well. The electronic ignition and high compression pistons are great to have at high altitudes. We had departure density altitudes as high as 7,400 feet. A reliable engine is always important, but when in the mountains, the price of poker really goes up.

We left Santa Rosa Tuesday around 8:30, but were stymied by clouds covering the tops of the first range of mountains. We landed at Sacramento Executive airport to get a closer check on the weather. I watched the weather all day because it looked like it might lift enough to make the hop across, then we hoped to at least do an overnight in Wendover Nevada/Utah. Since I am not a mountain pilot, I solicited the advice of a local flight instructor and he advised against trying it. Finally at 3:00 in the afternoon, we threw in the towel and got a room in Sacramento on Priceline.com.

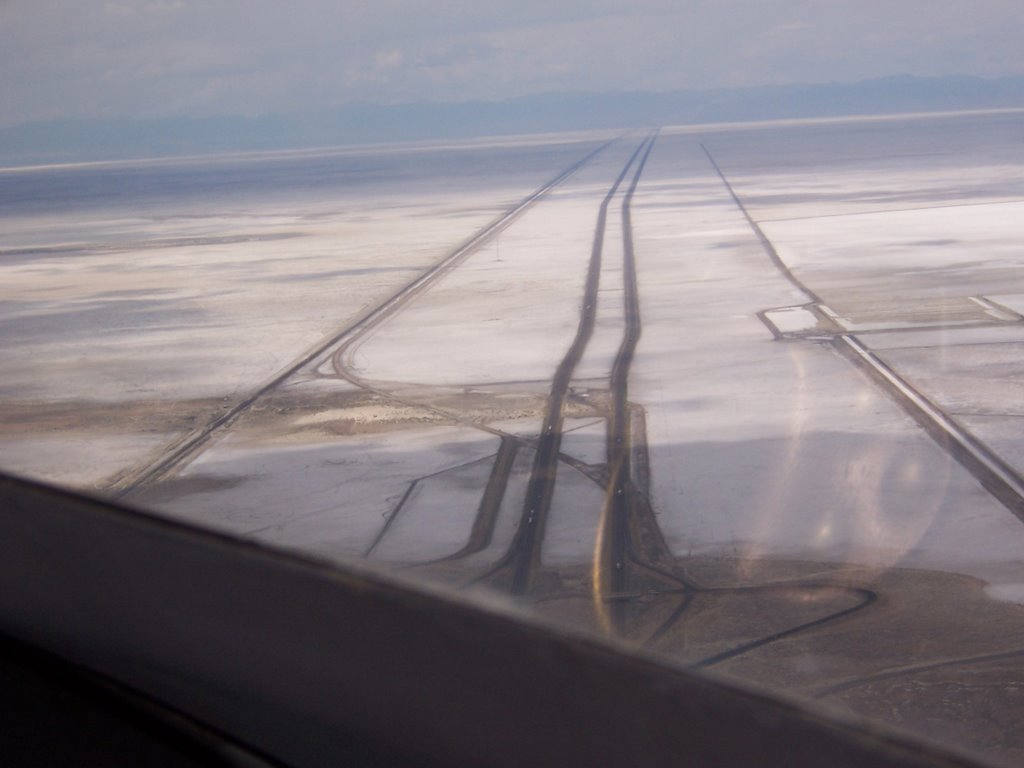
Heading east on Wednesday, we made it from Sacramento to Ft. Collins, CO, with a single fuel stop, again at Wendover. Beautiful scenery. After Wendover the winds really kicked in and we had lots of moderate to heavy turbulence in and around the Rockies.
We put about 25 hours on the plane, and on the day we arrived in California we celebrated the 20th anniversary of the first flight of N202SH.
Adventure is the spice of life!
We made leisurely RON stops in Topeka, Ft. Collins, CO and Wendover, UT (won enough money at the casino to pay for fuel and lodging) and finally Santa Rosa’s Charles Schultz airport. Crossing the Rockies and the Sierras is quite interesting. I have done that before, but this time there was more weather and wind to contend with. A Garmin GPS 396 would have been very handy to have.
My mighty O-200 performed really well. The electronic ignition and high compression pistons are great to have at high altitudes. We had departure density altitudes as high as 7,400 feet. A reliable engine is always important, but when in the mountains, the price of poker really goes up.

Our plans kept changing. After the reunion we were going to try and spend a couple of days in Reno, but after all the family events we were just ready to beat feet home. We’re sorry we didn’t get a chance to hook with our Q-brethren on the west coast, but we just ran out of time and stamina.


Heading east on Wednesday, we made it from Sacramento to Ft. Collins, CO, with a single fuel stop, again at Wendover. Beautiful scenery. After Wendover the winds really kicked in and we had lots of moderate to heavy turbulence in and around the Rockies.
We put about 25 hours on the plane, and on the day we arrived in California we celebrated the 20th anniversary of the first flight of N202SH.
Adventure is the spice of life!
Sunday, April 23, 2006
Using GPS to Measure Performance Enhancements
I have been scanning the internet looking for ways to properly evaluate some flight data I've gathered. I think I found the solution and thought I'd share it.
The question is "How do I accurately test for performance improvements"? Ken Paser did a lot of testing as documented in his book "Speed With Economy" but I believe I have found a better way. There are a couple of papers out there using GPS to determine true airspeed. There are a few different methods, but I like the ones published by the National Test Pilot's School. (Besides, Test Pilot's School sounds cool).
The methods are designed to determine true airspeed, but I would think it would be well suited to determining top true airspeed. The idea is, you go so some convenient altitude - say 5,500 feet, and do a full out performance run in either three or four different directions. You plug your values into the spreadsheet and voila! You have your accurate performance with the wind factor removed. The only caveat is that you should have the same indicated airspeed throughout the test. If your throttle is shoved all the way forward and locked down, this should be the case.
By using this simple test method, one could make performance enhancements and then have an accurate method of checking if they really worked. Please correct me if I'm wrong. Here is the link, read all three articles at the Test Pilot's web site.
I have used it a number of times and think it gives me the best idea if my mods are really helping anything.
Tuesday, January 31, 2006
My home made NASA autopilot
This is a little note about keeping your building in perspective towards the object of actually getting in the air.
Way back in '82 when I first got my Q-2 kit I was thinking about all the neat things I could do with my plane. Mind you, it didn't look like a plane yet, just a bunch of parts, foam, glass, and bottles.
I went to a forum at Oshkosh given by a sharp NASA guy (I think his name was Don Hewlett) and he was demonstrating how to build an auto pilot using a stream of air blown across a couple of thermistors. The first year I saw him, he used a tiny motor to drive a tiny fan. In later years he used an audio speaker mounted in an empty beer can. The pulse of the oscillating speaker was to produce a puff of air across the thermistors. As the plane shifted position, the air stream would be deflected and one thermistor would be cooler than the other one. This differential would be used to drive the autopilot circuit. I thought this was very cool. He even passed out his plans.
I had a retired Bell Phone Labs engineer willing to help and he carefully milled the housing for the fan and the tiny fan blade. I bet he spent 20 hours on it. I bought all the other components and etched the circuit board.
Meanwhile, my plane was sitting in the garage not going anywhere. I was spending all this time on the autopilot project and wasn't actually building anything.
Fortunately, I somehow realized that spending time on an autopilot was getting me absolutely nowhere towards me getting in the air. I didn't have my priorities on straight.
Now, as I go into my 20th year of flying my Q-200, all of those autopilot parts are still in a box in the hangar. Maybe I can make it work someday - maybe not. But I do know that once I got my priorities straight I started making real progress.
And that is why we urge people to follow the plans, at least as closely as possible. Get it in the air first, then add the autopilot, tip tanks, canard flaps, winglets, retractable gear, or pulse detonation engine in your spare time.
Thursday, December 15, 2005
More TCM O-200 improvements
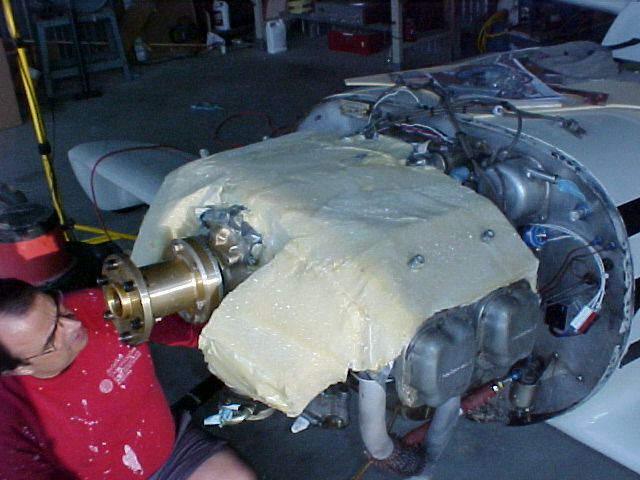
 I wish I took more photos of this engine. Here, you can see their extension for the oil sump. Interesting, eh?
Also, you want to look closely at the cylinder barrel fins. Notice that they are tapered. The tech rep told me that most of the cooling is done at the cylinder head and little heat transfer occurs at the barrel, so they removed cooling fin material to help lighten up the cylinders.
They also had a B&C starter installed.

O-200 oil presure sender
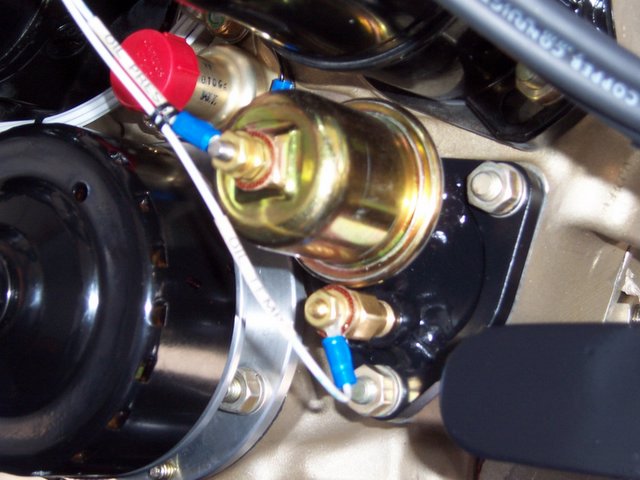 Here's a photo of the TCM display O-200 at last year's AirVenture. There are a couple of interesting changes that I was a little surprised to see.
 First, they installed an El Reno filter. Since they no longer needed the clunky oil screen they could now remove the oil screen housing.
They made a cover plate and welded in a couple of bosses so they could install the oil temp and the oil pressure probe. Next time I have my engine off I'm going to make a similar setup.
The red cap covers the tach drive and the round black thing is a B&C alternator.
Saturday, October 22, 2005
Baffling evolution
My Q-200 started out with the off-the-shelf baffling. It went through lots of changes which I don’t need to bore you with. I’ll try and keep it to the bottom line.
First – I don’t like oil coolers on the Q-200 installation. They are costly, heavy and are a possible failure point. In addition, they take up valuable cowling space, and when mounted on the firewall, make it that much harder to pull the engine for service.
So, the trick is to not have an oil cooler, but still keep the engine cool. Lighten and simplicate.
Enter the plenum. I saw plenum installations on two guys airplanes, Lynn French and Bruce Cranium and kind of liked the idea. My feeling was, though, that they weren’t getting all benefits available to them.
For that reason, when I decided to do the plenums, I chose to have it cover the crankcase split line. This way, cooling air will be forced over the crankcase and help cool the engine oil. I overhauled my engine a couple of years ago, and this was the logical time to make the new plenum baffling. The plenums were pretty easy to make. I just uploaded my plenum fabrication photos to my web log: http://samhoskins.blogspot.com/ so you can see how I did it.
The plenum really helped my engine cooling, and my oil temps dropped at least 20 degrees! I think I may have also picked up a knot or two. I did seem to have a high EGT on my #3 cylinder, which I chalked up to uneven fuel distribution.
I thought it was all better, but I met a guy named Sam James at Oshkosh. He makes cowlings for the RVs and he talked me into ordering a set of trick inlet rings. He said it would improve the cooling and maybe get me a little more speed. You can see his products here: http://www.jamesaircraft.com/ Notice that his plenums COVER THE ENTIRE CRANKCASE. His web site says about the full plenum cowl and rings: http://www.jamesaircraft.com/South_Shop.html He claims:
Average speed increase with the cowl and cooling plenum alone is 7-10 m.p.h.
“The increased speed is made possible through improved internal and external aerodynamic flow. This is accomplished in part by a slightly longer cowl which requires either a 4" prop extension or an extended hub propeller.
“The inlet design, influenced by NASA funded research conducted at Mississippi State, resulted in a 40% reduction in size while ensuring improved cooling in climb and cruise configurations.
“Overall drag is substantially reduced. Pressure loss in the upper chamber is negligible while cylinder head temperature variations are controlled uniformly to within a few degrees”.
Last spring I installed modified my cowling and installed the inlet rings. I didn’t notice any speed increase (rats!), but the engine is even cooler and now all of the cylinder temps are quite even. And you know what? That high EGT on #3 came down in line with the rest of my cylinders!
At this year’s AirVenture Cup race I ran around 1,000 feet AGL on a 90 degree day, wide open throttle, for two hours and twenty minutes. The oil temp never got over 210 degrees.
So, what works for me is: Full cover plenum baffling and no oil cooler!
Monday, October 10, 2005

Fast forward two years. The next significent change came a couple of years later when I modified my cowling inlets to the Sam James' Aircraft Company inlets. They greatly improved my cooling and really evened out the temperatures.
This photo just shows the end result. For the "How to" look through some of my previous posts.


Glassed. I did leave out a step in my previous description. I made up a couple of flat pieces of glass to use around the rocker covers. When it came time to glass the plenum, I joined them to the rocker glass pieces. I spread some light grease over most of the foam, prior to glassing, as a mold release agent. Notice also that the plenum was laid up in two pieces. This affords me a split line. I used three BID and Aeropoxy for most of the plenum.
If I were to do it over, the only change I would make would be to fabricate alumimium plates to go around the rocker covers. I have had some minor crushing of the glass under some of the rocker cover screws and the alumimium would fix that problem.


O-200 Plenums and cooling
There has been a lot of discussion about plenum baffling on the Q-200 Engine group. I thought I'd post a few photos about how I made mine. It was really pretty easy.
Friday, August 12, 2005

Here's the payoff! My average speed for the 500 sm. mile race was 200.3 mph. Though my time was 3 mph faster last year, we had significantly stronger head winds this year. Rob Martinson, in his highly modified Vari-Eze, beat me by 7 mph. Four years ago he beat me by 20 mph, so I'm edging up on him. This race is A LOT of fun!
Subscribe to:
Posts (Atom)