Wednesday, June 18, 2014

More Detail on Making Wheel Pants.

In the Quickie Aircraft plans, they have you make the wheel pants as a couple of straight-sided items, as seen her in Paul Fisher's beaut.


Air doesn't like to flow in a straight line around an object. There has been a lot of work done on pressure recovery wheel pants, and I thought it would be a good idea to take a clue from the guys working in this area.

So, the problem becomes, how to make a pressure recovery type pant with our little birds that use the pant itself to support the weight of the aircraft?  For the shape, I went to a set of RV-7 wheel pants and tried to emulate that shape. The way I approached it, was to build the interior of the plant per QAC plans. That way I knew it'd be structurally sound.  Once the slab sides are complete, I would build up the outside of the pant for the improved aerodynamics.  This would be a great place to use a wind tunnel and scale models, but unfortunately, that's not my bailiwick.

Again, I started out making the regular wheel pant structure, including the brakes and axle hard points.  I then fitted the wheel in place.  The brake calipers will be buried in the foam for the time being.


Next, using two part expandable foam, I glue Styrofoam scraps all over the wheel pant, giving it a slightly unaerodynamic shape. The idea is to build up enough for carving.


Now using a couple of templates as a guide, I get out my trusty Milwaukee Sawzall and start whittling away at it. I try to go slow and slice off a little at a time. Just like carving a turkey.  Keep your broom and trash can handy.


Here are a couple of videos showing more about my Sawszall art carving methods.

Part 1


After flipping the canard onto it's back, here is Part 2.


Saturday, June 07, 2014

Sam - Put Your Pants On!

I've been making some progress getting the new wheel pants fabricated and installed. First, I made the hot wire templates and installed on a block of foam. (As always, click on the photo to see the detail.)


Two cores are cut out, left and right.


Plywood hard points are installed in a 1/4" piece of white foam.  These hard points are reinforced with extra layers of glass.  The one in the center is for the axle, the one at the left is to mount the brake caliper.

I rigged up a simple vacuum bag setup which did a nice job of pulling the foam flat and sucking out excess epoxy.


Here, one of the wheel pant covers has been attached to the foam core. A similar cover is attached to the other side of the pant core.

The trick is to properly line up the wheel pants to give the proper toe-out and camber. I used David Gall's white paper to establish the proper numbers.  We took a cheap laser pointer and taped it to a tripod and first set it up so it would shoot through both wheel pants. That established our baseline.

Then we mounted a board at the center point of the canard and drilled a hole which was our target, again using David Gall's numbers.

Target board.

Once we were satisfied with the position, we used epoxy micro to lock it in place.  We used a hot glue gun and stirring sticks to hold everything in place until it cured.

 Major assistance was provided by Jerry Marstall and Pat McGuire.

 Now we're getting somewhere. a couple of days later the axle, wheel and brake caliper are installed.
 

Bill Hunter was kind enough to come over and help me flip the canard. The next major jobs will be carving and final glassing of the wheel pants, to a nice aerodynamic shape.


 While Jerry was here he directed fabrication of the collapsible Quickie Tail Cradle. This will greatly simplify tail removal.  Wish I had this 20 years ago.

Will I make to Oshkosh?  Stay tuned.

Friday, May 16, 2014

Starting the Wheel Pants.

I made some special off-plans templates for the wheel pants.  I am attempting to create pressure recovery type pants, but of course, the big challenge is adapting PR pants to the wing attachment. It was wet, raining and cold in the hangar, so we set up shop in the nearby T-hangar pilot's lounge.

Here, we are establishing the cutting pattern to make the two wheel pants.  There is both a left and a right pant, they are slightly different.


After the first core is cut, it left an interesting block of foam. Here the second pant is ready for hot wiring. They turned out pretty well.  By the way, that's a 2008 AirVenture poster in the background, featuring the Aeroshell cow, Amoolia. The poster is autographed by famous race pilot and altitude record setter, Bruce Bohannon.


Saturday, May 10, 2014

Catching up

A lot has transpired since my last update.  Progress is slower than hoped, but we did take a month's worth of vacations already this year.

Here is what my Quickie looks like right now. Sad.


Now that the main portion of the canard is done, it's time to attach the elevators.  This was pretty tricky, since I didn't have the right jigging template available. Pat is helping me keep lined up. The phenolic bearing blocks are attached with 2 BID.


Now it's time to install the slot cores. This is done by using the elevators to establish the position. I stuffed shop towels under the elevators to help exert pressure.  I used micro slurry as the interface, but wonder if pour in foam might be better.


Slot cores are now sanded smooth, getting ready for glassing.


A slot is routed out for the brake lines, then covered with dry micro.  I'll do the same thing on the opposite side for the pitot and AOA lines.


I discovered a few voids in the slot core/spar joint, so I dug it out, roughed up the spar, and filled it with two-part foam.


Here is the garage that I was able to use while building the canard.  It was a great help in the cold months, but now it's time to move back to my hangar.

Finally!

 Plastic Explosive - meet your new canard!

Work starts right-away.  Two lines are routed for the pitot and the Angle of Attack indicator.


Saturday, April 05, 2014

Elevating the Project

The big thing lately has been working on the elevators.  Having been frustrated with my hot wiring of the elevators, I ordered a set of elevator cores from Eureka CNC.  Real nice. 


This photo shows the foam blocks that the cores were cut from.


The aluminium torque tube being installed with wet micro, a mix of epoxy and glass microballoons. The torque serves as the backbone for the elevators.


The elevators have been glassed on one side. Looking pretty good.


Fast forward a bit. The elevators are glassed on the bottom side first.  After curing for a couple of days, the top side is glassed.  To make sure it all remains nice and straight, we lightly clamped the trailing edge to a very flat table.


 Canard jigged in preparation for installing the elevators and attachments.


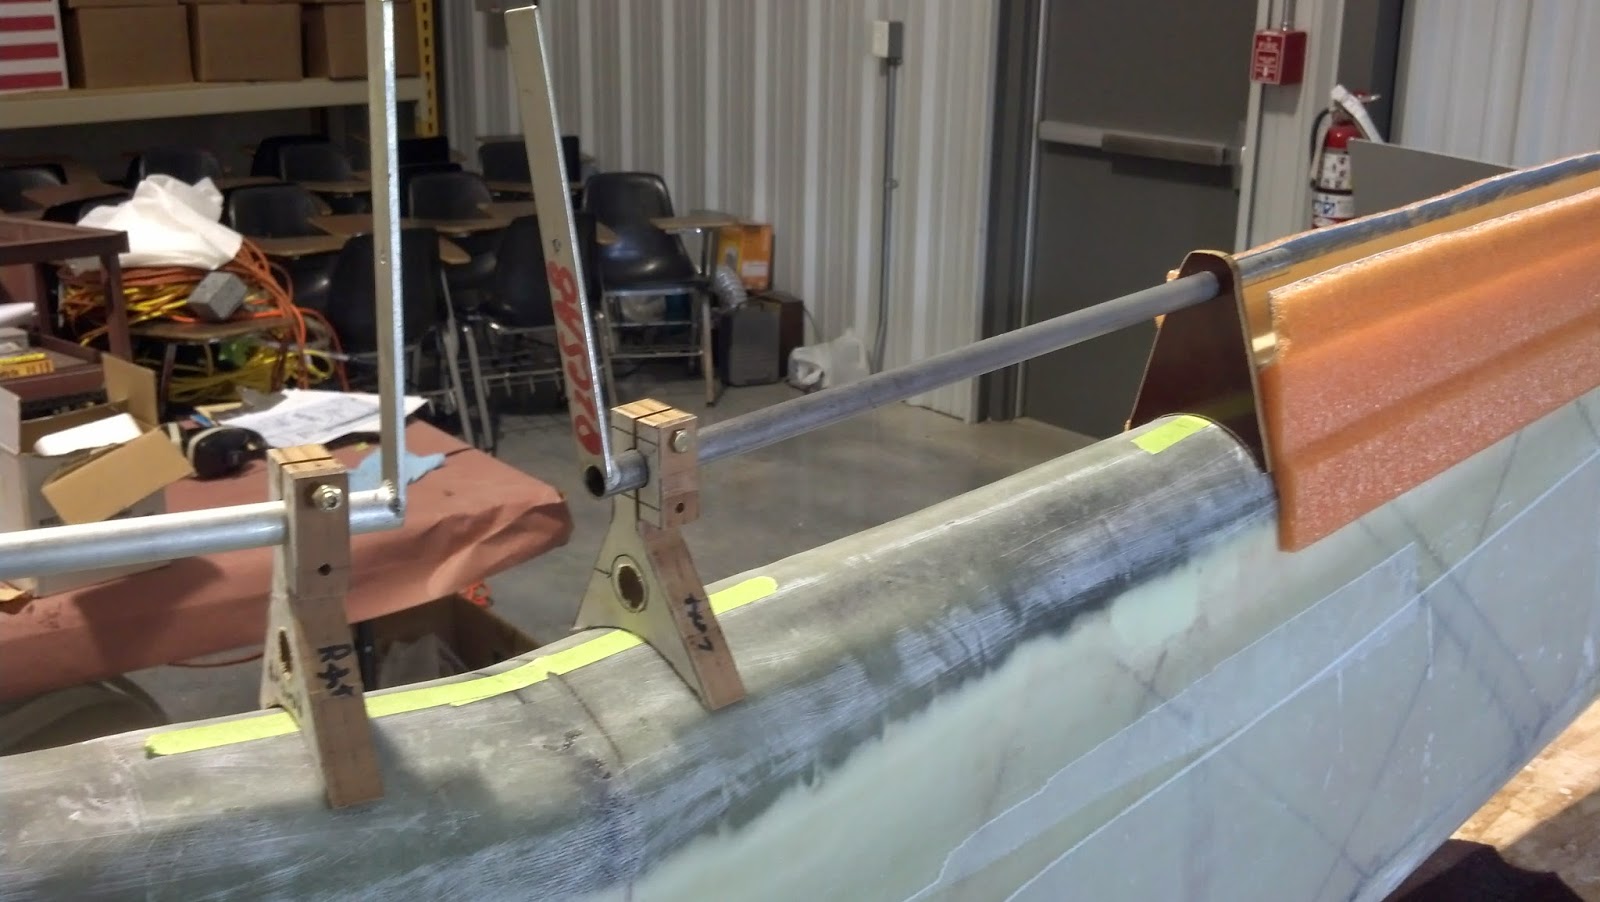
The next order of business is to do a lot of fitting.  The orange slot cores are positioned and roughly trimmed to length. The phenolic elevator hinge bearings are cut and positioned, then I try and figure how it's all going to align properly.

A major gripe I had about the Quickie Aircraft Company (R.I.P.) plans, is they hardly ever used dimensions, only templates. Say you wanted to know how far the elevator torque tube should stand off from the canard spar.  All we can do is take our best guess, hence the tag EXPERIMENTAL.

 Those vertical arms will eventually connect to the aircraft's control stick.


It's starting to look like a real canard (front wing). I have still several small aluminium parts to make up and fit. With a bit of perseverance, I should have all this rigged up within a week or so.  Ha ha.


Wednesday, March 05, 2014

A bit of progress

Nothing much happened on my end for the past 3+ weeks, as we took a break from winter for a Caribbean cruise, then a few days in New Orleans. It was a dirty thankless job, but someone had to do it.

But, things are happening now.  My elevator cores are complete and en-route from Eureka CNC in Nevada. It will be nice to get those part complete.

Even bigger news,  my engine has been checked and overhauled by Bob Malechek and it is on it's way from Texas, as we speak.  It's time for me to get out of the vacation mode and back into the Git 'Er Done mode!


Tuesday, January 21, 2014

And One Step Back

Next job is to fabricate the elevators and mount them to the canard.  Each elevator consists of two foam cores joined with micro.  A one inch diameter aluminium tube is bonded into the core. This block of orange Styrofoam seems to have lots of internal stresses, because after we hot wired it, it wanted to curve. I had such a hard time getting the tube through the foam, I wound up adding another lengthwise cut so I would not have to insert the tube into one end.

I also think the hot wire tension may not be high enough, but I am afraid that if I make it any tighter I will bust my hot wire saw.  I wound up discarding the first set of elevator cores we made, cause I didn't like them.

Pat just wandered in the garage when I was starting on the first core and he volunteered to mix epoxy and micro.


I don't remember having trouble with this thirty years ago, when I did this the first time, but be had a heck of a time.  I won't bore you with all the details, but we wound up with a piece that was way too heavy and I fear the dimensions may not be right.

 I just ordered some super-duper superalloy ultimate hot wire which has a much smaller diameter than the stuff I was using.  I have just enough foam left to try another set.  If they still come out crapola, I'm going to bite the bullet and order a set of cores cut on a CNC controlled hotwire machine.


Sunday, January 12, 2014

Last week, we had a great Saturday, applying the glass to the upper surface.  We were fortunate to have a warm day, so the room heater didn't have to work too hard.  I think I kept the temperature around 78 degrees, to help the epoxy flowing smoothly.  I was happy to have a big crew show up, and now that everyone had been through this dog and pony show once before, everyone kind of knew what to do.

Ariel view shows the raw orange foam, the bias alignment marks, and the end sport for the spar caps.


 A low spot was filled in with dry micro the day before the major layup.


Everyone's making sure the fibers line up and that it doesn't try and get away.


Dr. Rodriguez lays it on thick. This is the third ply, which is span-wise to the whole canard.

Clarke and Larry keeping the fibers straight for one of the spar caps. Hard to see here, but I added four extra spar caps to try and eliminate some of the dimpling that has appeared in several flying canards.  This is just my experiment, your results most likely will vary.


Wetting it out, Boss!


 Layer of Peel Ply added to everything.


Complete


 Crew enjoys a cold one after lots of great work.