Thursday, May 15, 2008

Induction air

When I started this racing craziness, my wife and I were talking to Rob Martinson about how he gets his Vari-Eze to go so fast. He said that he goes to these races and pays attention to what the other guys are doing and borrows from them - and that's what I now do. It's kind of like going through the grocery store; I pick a little of this and a little of that.

At Oshkosh I sit in on any forums that have anything to do with speed, performance or efficiency.

As a result, this is where it starts getting really hairy - or should I say Harry?

At last year's Tandem Wing Spring Fling in Iowa City, I met a character, name of Harry Hinckley. Harry was modifying Greg Zimmerman's SX-300 for the upcoming AirVenture Cup race. One of the crazy things that Harry was up to was pulling his induction air from the cooling inlets. The idea here was to help reduce the drag of a separate inlet to feed the engine.

I thought it was probably kind of hair-brained and looked like a lot of work. As it turned out, Harry & Greg took second place in the Sport Class at a blistering 302.27 mph. See the rest of the results of the 2007 AirVenture Cup race. They were 11 mph faster than the closest SX-300!

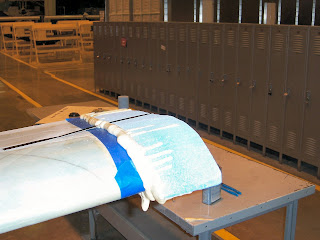
So here is my attempt at having an internal induction air system. One of the hard parts was finding a suitable material to form the shape. After trying some hard plastic tubing that was difficult to shape, I stumbled across foam pipe insulation at the hardware store. I packed it with oil-dry to keep it from collapsing in the bends.

Once I had it duct-taped and safety wired in place I wrapped it with clear packing tape to make the interior as smooth as possible. I then gave it a single wrap of BID and spiral wrapped it with peel ply. In a couple of days, once the epoxy has firmly set, I'll slit the fiberglass, remove the foam, then glass over.

Initial concept using a shop vac hose.

Foam taped in place

Foam duck-taped, wired and covered with clear tape.
Glassed and peel plied.


Snouts

It's time to start on the cooling inlets. Click on the photo for a larger view.

Foam is clued to the plenum using two-part foam from Tap Plastics.
Shape until it looks like a snout.
I coat the raw foam with water soluble drywall paste. Then apply a couple of coats of automobile paste wax. This photo shows the left snout waxed.
Glassed with three BID

When cured, I chisel out the foam. The drywall paste dissolves in water and we get a fairly smooth interior.


Intake elbow and Throttle Body Installed.


Here is the installation of the TB and inlet elbow.

Tuesday, May 06, 2008

Induction & injector placement


It's finally time to start installing the Electronic Fuel Injection (EFI) system. The plan is to use a Real World Soultions electronic controller. For redundancy the RWS EC-3 controller has an "A" side and a "B" side. I will have five fuel injectors - one on each intake tube ("A" system) and a single one on the throttle body ("B" system). The engine will normally operate on the "A" system and "B" will be used if something bad happens and I need to get on the ground safely.

I am using an automotive racing throttle body from Jenvey, which has a provision to mount an injector on it.

I formed the intake manifold using blue foam, which I covered with water soluble drywall paste and then mold release. First I glassed the tube itself with 3 BID. I tried vacuum bagging it, which seemed okay. After cure I dug out all the foam and the inside was pretty smooth. The flanges were floxed in place and later I used 2 BID to secure the flange to the tube. After all that was done, I trimmed it and drilled the mounting holes.

I may not stay with this design, the sharp elbow may not be the most efficient, but it will be a good baseline for me.


Click on the photos for a larger view.


The other big challenge is getting the fuel lines to all the injectors.


Friday, May 02, 2008

Stretching the Cowling

I thought it would be cool if I could lengthen the nose a little. I started by ordering a 7" prop extension from Saber Manufacturing. I also added the 60 tooth wheel that I'll need for the new electronic fuel injection system.


By the way, I was concerned about the trigger wheel rusting. One of the guys on the Q-200 Engine list mentioned Brownells Gun-Kote. I got a can off Ebay and followed the distructions. That is neat stuff and it worked great.


I really didn't want to take on making an entire new cowling, so I decided to just stretch the old one.


I sketched a few lines on the cowling of where I thought the cut should be.


It was kind of weird after I cut it up. It just seemed too easy to destroy it and the pieces that were left over seemed so pitiful.


I kind of jigged the two pieces in place where I thought they ought to go, then I used two-part foam to build a base for the glass repair. I got to dig out the Milwaukee Sawsall again, as I carved it out.


I put on two pieces on BID glass on the outside layup.


Once that cured, it was Sawsall time again as I removed the backing foam. Sanded the inside, then applied three layers of BID. It seems a little heavy, I probably would have been fine with two layers.

I'm pretty satisfied with it. The lower cowl will be trickier but I'm going to hold off on that until I get the new induction system, oil sump and fuel rail rigged up.


Time to Start Filling and Sanding


To keep this post short and simple, let's just say I used the advice from George Sychrovsky and Wayne Hicks. Be sure you read those two links if you are going to finish your plane. The Prime Directive is, "ONLY FILL ONCE"!!! If you and filling, sanding, filling and sanding, you are doing it wrong. I used their method this time around and am very glad I did. However, I did not go the black primer route.

I used West System, which is non-structural for aircraft, and glass microballoons. First, I filled low areas using the fast hardener. Then I started mixing and mixing and spreading and spreading. I really lathered it on. I bet some places were at least 3/8" think. But again, the idea is to lay it on only once and sand down to the low spots. It took me about 1-1/2 hours per wing panel, doing one at a time.


After about 5 hours of cure time I can go at it with a Stanley Surform file to knock down the high spots.


I used two-foot sanding boards with 36 grit paper. I use the 3M stuff that already has the sticky back. Per George's recommendation, I made the boards from laminated bookshelf boards I got from Lowes, then attached a piece of angle aluminium on the back. Before got really into it, I took a pencil and really marked up the surface. This helped me gauge how much I had sanded and identified the low spots that I would sand down to.

Sand, sand, sand for a couple of hours. Note the pile of dust. Really though, it's not that hard. I just say to myself, "I am going to work on the plane from 9:00 to noon, and when it's time for lunch I will have a sanded wing panel"! I bet I sanded off over 80% of the micro that I applied.

When it looks good with the 36 grit paper, I switched to 80. Just a few minutes with the 80 and that's it! At this point there are all sorts of awful holes, crevices, and scratches. Previous methods would have had us filling and refilling. Yeaucch.

Next, I do the epoxy wipe. Mix up a full cup of West and squeegee it on. I just apply enough to make it wet, then try and squeegee it all off. I am not building coats, I am filling the imperfections. I repeat this every hour until I have applied 4-6 coats.


Next say put some 120 grit paper on the sanding boards, make a few passes and I'm ready for primer! I love it!

Wing Tips


Time to install wing tips. First I glue on some foam using two-part expanding foam. Next I take out my trusty Milwaukee Sawsall and start trimming until all that is left what looks like a wing tip.

A little sanding and it's looking good.


Bond in some plates to hold the strobe lights, glass it all and we're done.

Fix an Oops!


After the wing was mounted, I found there was a slight upward bow in the outermost portion. I agonized about it for a long time, but was fortunate enough to talk about it to Mike Bergen. Turns out he had the same condition and that it was easy to fix.

I started by marking the upper wing, then simply slit it with my Dremel. Using a hack saw blade, I scored the foam all the way through to the lower skin.

Next, I stuck a couple of tongue depressors in the slit to open it enough to take the bow out of the trailing edge. It wasn't much!

I filled the wound with TAP 30, expanding foam from Aircraft Spruce. By the way, DO NOT use the two part foam from Wicks. It is really lousy, weak and crumbly.


Made a standard BID repair over the foam and the job's all done!