Tuesday, March 11, 2008

Wheel pant skirts

A long time ago, the Quickie Aircraft Company used to race the prototype Q-2. One of the things they used was removable wheel pant skirts.

When we had my plane flipped over, C-Rod came over and remarked that I was probably getting a lot of drag from the underside of the wheel pant, and when you look at it, I'm sure he is right.


This was the only time I could do anything about it, so we I dug in. I figured I could make some kind of cover, but the trick would be holding it in place. I finally decided to put slot in the wheel pant to hold the aft end of the skirt, then I would use a single fastener for the front.

First, I make a crude template from stiff paper. Then I made up a couple of flay lay-ups using two layers of carbon fiber.


The slot was cut into the pant and I stuffed flox into it to stiffen it up. While the flox was still wet, I stuck in a piece of aluminum covered with clear tape (black arrow). That would form the slit in the slot.

I needed a way to stiffen the skirts, so I made some vertical stiffeners by laying up strips on the inside of the wheel pant. This would get me a general shape. The stiffeners were attached to the skirt, in situ, then finally the front attach point was added.


My thoughts are to use the skirts only while racing and to be able to remove them without having to jack up the plane. However, I will probably have to jack up the plane to insert them.

I hope this gains me a knot or two.

Sunday, March 09, 2008

Canard Fillets


One of the aerodynamic clean-ups on my list was the fillets where the canard comes up to the fuselage. I wanted to smooth out the airflow around this area, and I also wanted to cover up the slot gap that allows you to remove the canard.

After the plane was flipped over, I ground down the paint in the fillet area and cut off the old fillets. The first photo shows a paper mock-up, taped in place. You can click on a photo to see a larger image.

Then, using expanding foam (second photo), I built up the area. I use foil, cardboard, paper, duct tape; just anything that can keep the foram in place while it's expanding.

Time for my trusty Milwaukee Sawzall for the initial carving. I also use hacksaw blades and sander blocks. I just kind of keep on trimming until it looks good.

Get some glass on it and we're good to go. I also made aluminum cover plates to cover the slots.


Installing the New Wing


Since I always had to fly around with the ailerons reflexed up about 3/8", I decided to change straighten it out and raise the trailing edge of the new wing by about 1/8". Using digital levels, this translated to lowering the L.E. by about 0.5 degree. There is a lot of "by gosh and by golly" engineering here.


I made a template and bondoed it onto the old wing and brought the airframe to a position where the top of the template was level. (The old WL15 marks are long gone). When it was time to insert the new wing, I used the same reference, raising the T.E. 0.5 degree. I won't know until the first flight it this was a good thing to do, or not.

Note added 11/08/2011: It turned out just fine.

Digging the hole deeper


This year, for Christmas, my wife offered me either a new interior or a new canopy. I have been flying around for the last five years or so with a small crack in the canopy (the left wheelpant did it, but that's another story) and she thought it looked tacky to have the crack covered up by a Rich's Incredible Pyro sticker.

I couldn't very well get a new interior, and ruin my reputation, so I got hold of Todd's Canopies in Florida, and he happened to have exactly what I needed, on the shelf. When it arrived, I took out the old canopy and ground down most of the glass, leaving this flimsy frame. Installation has not yet started, but I thought I'd show you what I have to begin with.

Saturday, March 08, 2008

Electronic Fuel Injection not recommended for Qs

Klaus Savier runs the AirVenture Cup race at about 254 mph, with his O-200! This year Klaus gave a forum at Oshkosh. He was telling the audience how great fuel injection was and the great efficiency that he got out of the engine. He said when he slows down to 150 kts. he is approaching 100 mpg!

Of course I asked Klaus if he was going to make the EFI available as a product. He said that he was doing fine with the electronic ignition systems and didn't want to incur the liability of selling systems that have 40 psi fuel in the engine compartment.

Naturally, I was quite disappointed and naturally, I decided to make my own.

Having gotten into this process of having an all electric airplane and then having an electronic fuel injection, I better understand Klaus' concern. First, you need a bullet proof electrical system. Not just for today, but for the next umpteen years your creation will be in the air.

Then there is the fuel system. You have to have a great throttle body. You have to have a high pressure fuel pump and a back-up. You have lots of extra plumbing. You have fuel injectors, you have lots of extra fuel line connections in the engine compartment. You have a fuel regulator. You have to have a better fuel filtration system. You have to have a bullet-proof electronic fuel controller and sensors. There are other sensors, too.

Then there is the electrical system. This system will draw five to seven amps in normal flight. That means five to seven amps to keep it in the air. Below that and the fan stops.

Personally, I feel like I am on the edge with this project. I want to do it, and I can do it, and I will do it, but it is not easy and there are a lot of engineering challenges.

For all of these reasons I would STRONGLY urge the first-time Q-200 builder to not to attempt an EFI system. Use the good old MA3-SPA carb. Use a single mag with an electronic system and work into it slowly. Learn about the foibles of your electrical system. Learn how to fly the plane. After you get competent, then start fooling with it - but please, not before your first flight.

Electronic Fuel Injection & Ignition

A couple of years ago, Lynn French blazed new territory and installed an EFI system in his Tri-Q. From the research and safety point of view, Lynn did it right. He kept his carburetor and installed the fuel injection on top of it. I decided to build on his work and jump in wit both feet.

Lots and lots of parts were ordered. First I placed the order for the RWS EC2 engine controller. I'm not going to list everything here, but there is A LOT to pull together.

With the help of Jeff Sell, in Wisconsin I put together the new intake tubes with the injector bosses welded in.


This shows the injector and the fuel connection.


Lynn had simply used the carburetor as the TB. I found one from an English racing supplier, Jenvy. This TB also has a port for an injector. The EFI controller has redundant A/B systems. My primary system will use the injectors mounted on the intake tubes. The back-up system will use the single injector mounted on the throttle body itself.


The next item was the trigger wheel which tells the controller the crankshaft position. Lynn provided a source, I would up getting a smalle, 6" diameter wheen and had it machined. The wheel was about 1/8" thick, so I had the machinist reduce the thickness in the middle, to preserve the amount of grip between the prop lugs and the propeller.


I also had to source high pressure fuel pumps, hoses, injectors, and a bunch of other stuff. This will be challenging and fun.

I am still waiting for the controller from RWS.


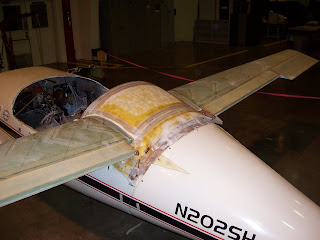
The Sawzall Massacree


Let the pictures speak for themselves.

What was wrong with the old wing?

As I mentioned, I just happened to have a spare Q-2 wing laying around. There were a couple of things about the old wing that I didn't like. Foremost, was the use of the wrong filler that I used 22+ years ago. The Quickie dealer I shared a hangar with, urged me to use this stuff that he used and he purchased from a local hobby shop. (Obviously, I didn't know squat back then). He said if I mixed this stuff with microballoons it would set up in an hour and I could start working it the same day, instead of waiting a day or two using Safe-t-poxy. Seemed to make sense at the time.

I barely knew the difference, but this stuff was a polyester resin. It seemed to work well for finishing, but my problems didn't surface until a few years after I was flying. It seems the polyester soaked through pinholes in the wing's surface and made it's way to the foam. I believe it actually cavitated the foam and over years left a series of little depressions in the thing. Mostly on the underside. One year I drilled small holes in the depressions and injected wet micro, but that was mostly a cosmetic fix.


Composites are really strong, but that always nagged at me. Then there was another mysterious problem. Just outboard of the fuselage on the upper surface, there was a mysterious indentation in the wing, about the size of your hand. The casual observer would never see it, but I knew it was there, but didn't know why.

Was it because of the polyester? Had it been overstressed? Did it happen when I once plopped a little girl on the wing for a photo op? I don't know.

So, I elected to make a new, stronger wing. I used the same shape, but I made two changes. First, I added one more uni spar cap on the top and the bottom. I adjusted all the layers to suit. I also terminated each spar cap with a "point", rather than being squared off, per plans. This should avoid the composite equivalent of stress risers.


The last problem was with the rigging of the wing itself. Early in my flight testing, I had a mechanical failure of the rudder system and went off the runway, and the plane flipped over and broke the wing. A new wing was build and installed, but I think the angle of incidence was incorrect, since I always had to fly around with the ailerons reflexed up about 3/8". So, replacing the wing would allow me to try and correct this at the same time.

Instrument Panel

The big commitment started with removing all of my steam gauges and the instrument panel. I had parts coming in like crazy and, at the same time, getting rid of stuff on Ebay. I ordered a piece of aluminium and started laying out the panel.

I am jumping in with both feet and leaving little room for error. The panel will consist of:
  • Dynon FightDeck D-180
  • Panel mount for my Garmin GPS196
  • New ICOM radio
  • Transponder
  • Hobbs meter
  • Switches
That's it. No back-up altimeter/airspeed. No compass.

To pull this off, I'm going to have a great electrical system so I started by ordering a 30 amp alternator from B&C.

I then cut out the panel, installed the brackets and dropped it off to be powder coated. I would rate the powder coat job as being "fair" - no great shakes. But for now, I'll set it aside as I get into the major work.


I'm at it again....


At last year's Tandem Wing fly-in Spud and Doug conspired and put a price on my head. They each offered to put up $100 to anyone, in the tandem wing class, who could post a faster performance run than I could.

What did I do to deserve that?

Anyhoo, life's circumstances have made it possible to fool around with the plane for a year, so I decided I might as well jump in with both feet. Here is the first go-around of year's project list:
  • Install new, stronger, rear wing. With the help of Paul & Roy Fisher and Charley Rodriguez I had made a new wing about three years ago and never got around to installing it.
  • Install electronic fuel injection and ignition, treading the trail that Lynn French blazed.
  • Build a new instrument panel, featuring a Dynon FlightDECK D-180
  • Aerodynamic clean-up including; new canard fillets, clean-up wheel pants, lengthen engine cowling 2 inches, low profile oil sump, and other items such as fixing canopy gaps.
For Christmas, Sandy offered me either a new interior or a new canopy (the old one had a crack in it). I took the canopy.

So, where was all this work to be done, here in the southern Illinois winter? Out of the blue, John Cotter offered my a small plot of real estate in the Southern Illinois University's Aviation Technologies hangar! The best of all worlds; heat, light, and daily trash removal.

So, a couple of weeks before Christmas I moved into my winter home and pulled out the Sawzall.

This is really going to be a lot of work, but it is all fun. I think Spud & Doug ought to offer their bounty to me.